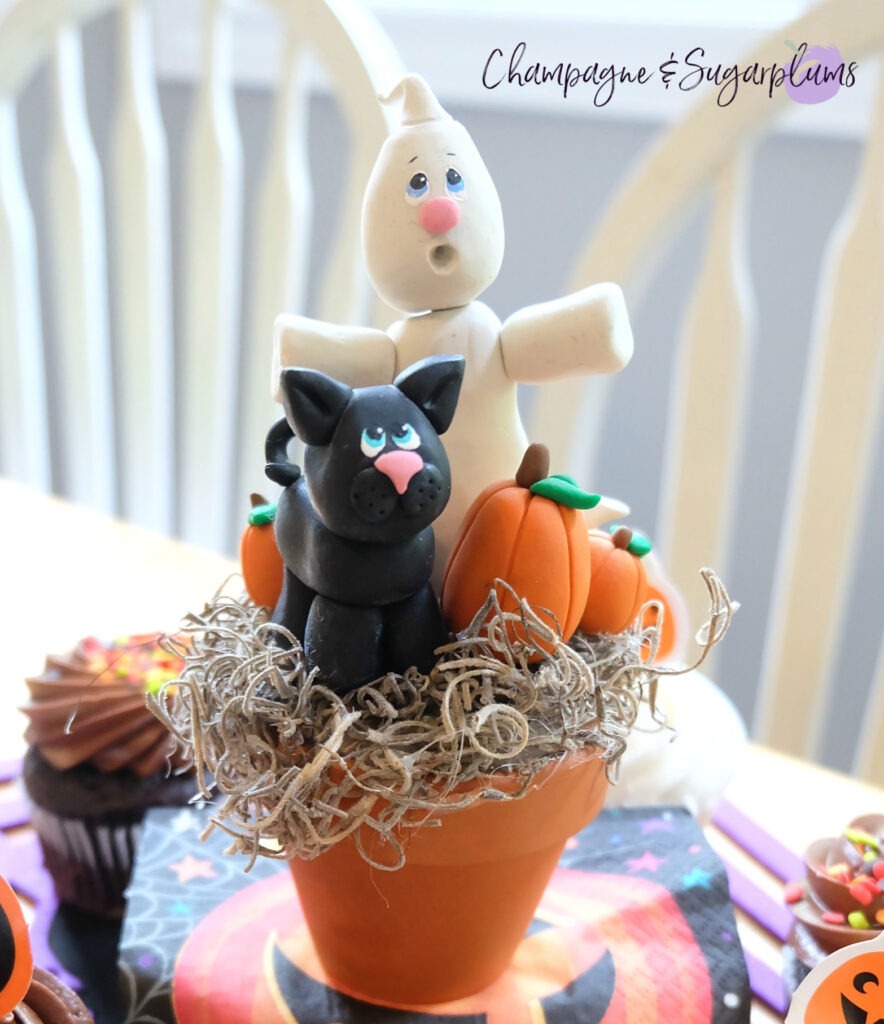
The Cutest Halloween Dessert Table or Charcuterie Board Decoration
Charcuterie boards have been a popular item recently but we haven’t really seen any decorations to go along with them…until now! This week we want to share this super cute Halloween Dessert Charcuterie Board Decoration. This polymer clay sculpture is easy to make, whether this is your first time using polymer clay or if you’re a seasoned pro, these characters are super cute and fun to make!
This blog post may contain affiliate links. What does that mean? We may get a small commission if you make a purchase using our links, which helps us to keep posting new holiday content every week.

If you haven’t used polymer clay before, these will be an easy introduction. The polymer clay needs to be cured – or cooked. An old toaster oven (one you aren’t going to use for food anymore) is great for clay cooking. Today’s polymer clay design requires clay that comes in different colours, then when the sculpture is cured we need to paint the little eyes and noses.
Halloween Dessert Charcuterie Board Decoration or Dessert Centrepiece
![]()
What do you need to make a charcuterie board or dessert table decoration?
- Polymer clay in: white, black, orange, green and brown
- Clay pot
- Toothpicks
- Floral foam (to place in the pot)
- Spanish moss
- Glue
- Paint (for the small details) in white, blue, pink and black
- Pain brush
- Small crochet hook

How To Make The Cutest DIY Halloween Dessert or Charcuterie Board Decoration!
What are some Quick Polymer Clay Tips?
- Firstly you’ll need to knead all of the clay to soften it, try to avoid creating bubbles and squish out any that do form.
- Bake your clay in an oven or toaster oven. Polymer clay cures at 275 F which is even lower than baking cookies!
- Polymer clay should be baked using the manufacturer’s advised temperature (usually 230°F – 275°F).
- Baking times are typically 15 – 30 minutes for each ¼ inch thickness. Thinner sculptures will take less time than thicker.
- Place your clay on a baking sheet lined with parchment paper. For sculptures like ours, you can use a cornstarch bed or we prefer a polyester fibre to hold the characters shape.
- To avoid browning you can use aluminum foil cake pans to place your sculptures in and cover with another.


How to make a polymer clay ghost:
Firstly, begin with the white clay, role a small oval with a point on the top, bend the point down, use the small crochet hook to create an open mouth. Secondly, place a toothpick into the bottom of the head, we will use this to attach the ghost’s body.
For the body of the ghost, create a long oval and form it into the shape of the ghost. Add two arms, beginning with a cylinder shape and then pressing one end with your finger to create a dent, add a toothpick to each arm. Stick the head and arms into the body of the ghost. Add a toothpick to the bottom of the body so it can stick into the foam.

How to make a polymer clay cat:
The cat is done in a similar fashion and therefore not very difficult. Create four cylindrical legs and a round head, insert a toothpick into each piece and stab them into the round body. Certainly don’t forget to add a long tail and some triangle ears! Add a toothpick to the bottom of the cat.
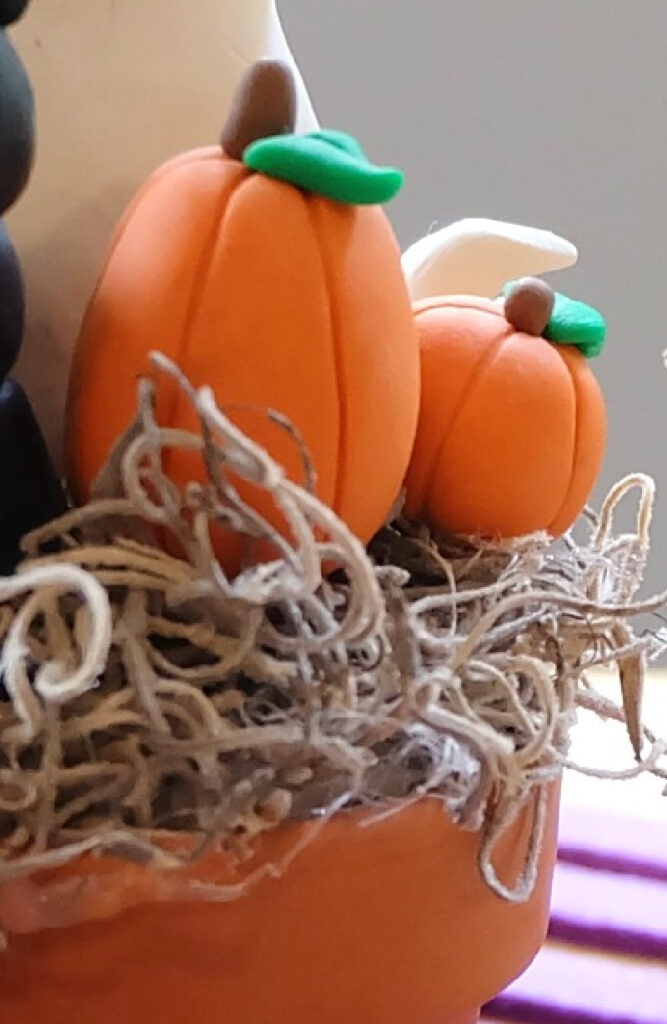
How to make polymer clay pumpkins:
Lastly, create pumpkins using the orange clay. Roll 2-3 balls of of clay, varying in size and shape. Create one oval, tall pumpkin and some smaller, rounder ones as well. Once you have your desired shape, use a toothpick to create the ribs of the pumpkins. Finally, add a brown stem and a shaped green leaf to the top of each pumpkin, you could get more detailed and add a small brown vine to some of the pumpkins! Don’t forget to add toothpicks in the bottom of each to stick into the foam.
Putting it all together:
Finally, place all of the pieces in the toaster oven and bake according to the packaging (see our quick tips above!)
While the clay is in the oven, cut and fit the styrofoam into the clay pot. Place some glue into the pot to make it secure.
Finally, once the cute characters have cooled you can stick them into the foam and use glue to adhere the Spanish moss around the characters to create the ground.
Voilà!


We hope you loved The Cutest Halloween Charcuterie Board and Dessert Table Decoration!! We think it’s so cute and the perfect way to add a little cuteness to your Halloween party, work event or family dessert! If you’re looking for more Halloween projects certainly check out our amazing Glam Purple Pastel Jewelled Skull for a Stylish Halloween. Happy Crafting!